A DIY dog collar is an ideal exhibition of art, improvisation, and simplicity at a low cost while having fun. Your Dog can be rocking a beautiful, comfortable handmade dog collar in no time. It will just be a matter of following a few simple steps. Basic sewing techniques will also come in handy in making a DIY dog collar.
This particular DIY dog collar is of nylon fabric detailed with designer patterns of your choice. The following components are required to make this special dog collar scissors, iron box, sewing machine, a side release buckle, nylon webbing and a nylon fabric of your choice, a tri-glide slide and thread with matching colors to your fabric.
These items can be obtained from shops or in dog kits of doing it yourself. Before you start making the collar, you will need to determine the collar size of your dog, for the sake of accuracy some pre-measured sizes for fabrics used for various Dogs are as follows.
For Large Dogs, a 4-inch wide, 34-inch wide long fabric and 1-inch webbing will work best. For medium-sized Dogs, a 3-inch wide, 25-inch long collar and half-inch webbing will be enough. For small sized Dogs’ 2-inch wide, 19-inch long and half-inch webbing is appropriate.
Interested? Read About Bichon Poodle Mix
Collar hardware should also be used in appropriate size by the Dog’s neck size. Here are the steps to follow after reading all your tools and supplies according to your required size specifications.
| Dog Breed | Finished Length | Fabric Size | Webbing Type | Webbing Length |
|---|---|---|---|---|
| Extra Large | 28 Inches | 3 X 38 Inches | 1 Inch Heavy Nylon | 35 Inches |
| Large | 23 Inches | 3 x 33 Inches | 1 Inch Heavy Nylon | 31 Inches |
| Medium | 18 Inches | 3 x 27.5 Inches | 1 Inch Heavy Nylon | 25 Inches |
| Small | 14 Inches | 3 x 24 Inches | 3/4 Inches Light Nylon | 22 Inches |
| Extra Small | 12 Inches | 3 x 19 Inches | 5/8 Inches Light Nylon | 17 Inches |
| Mini | 9 Inches | 3 x 16 Inches | 1/2 Inches Polypropylene | 15 Inches |
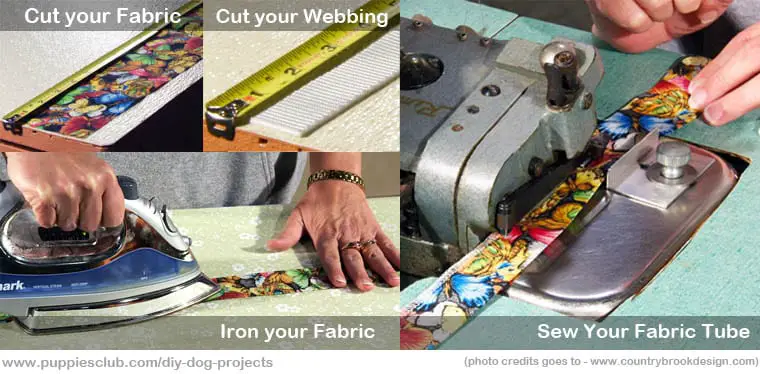
Cut your Fabric
Cut your fabric following your size requirements giving enough width allowance to accommodate your webbing. Some pre-measurements have been highlighted above that can guide you in cutting your fabric accurately.
Cut your Webbing
It’s time to shape your webbing to the required length. Measurements are crucial so you may re-measure before you cut to ensure you got them right. After cutting the webbing nylon, small fibers may be left at the ends, and it’s good to melt them together to provide the webbing is durable over time.
Ready the Fabric
This is where the iron box comes into use. Using the correct iron box temperatures by your fabric smoothen it out straightening out all the wrinkles. A common tradition would be to sprinkle some water on the wrinkles then straightening them out using the iron box. A smooth fabric will enable you to sew the fabric better.
Sewing
The fabric is all ready now to be sewed. A sewing machine is recommended as hand stitching is not that strong. Thus your sewing machine skills will come in handy. Our objective will be to sew the fabric letting it take the shape of a straight stretch.
Load your bobbin full of matching thread and set your sewing machine. Sewing the fabric inside out since later we are going to turn it inside right. This straight stretch shape should be large enough to fit your webbing without much strain.
Insert the webbing
After your fabric is all sewed up turn it inside right so that the sewed region can be concealed. Insert the webbing in the looped fabric and adjust the fabric so that it becomes well aligned and the edges of the webbing fit in the edges of the fabric perfectly.
To enable this, you should iron your newly formed collar to straighten any wrinkles formed. Sew them together to ensure the fabric and webbing are compact. The thread should go through the fabric and webbing.
Insert you tri-glide
Add your tri-glide by sliding the webbing up through one side then over the center and slide it out through the other end. After adding the tri-glide stitch the end of the color to make it rigid.
Fix your male end buckle
With your slide release buckle fix the male end onto the collar. Make sure it reaches the tri-glide as the male prongs face the tri-glide. Weave the webbing back into the tri-glide to lock the male end of the buckle.
Add your D-ring
Insert the D-ring onto the collar. Don’t mind its positioning as long as it is in the collar.
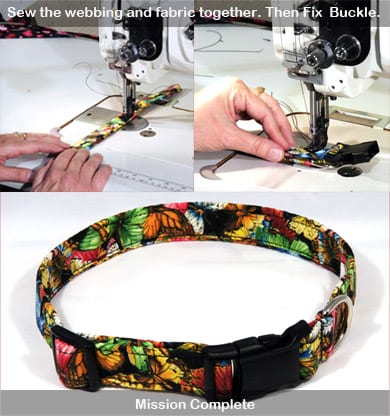
Fix the other female end of the buckle
The female end of the buckle should be inserted up to the desired length in your collar at the other end of the collar. It should be sewed there using any preferred stitch. Your DIY dog collar is complete now and ready to be fitted on to your Dog. With those few and simple guidelines, a DIY dog collar is super easy and fast to make.
Know More About DIY Dog Projects
All photo credits go to – www.countrybrookdesign.com
Complete Video Guide by Professor Pincushion YouTube Channel
